


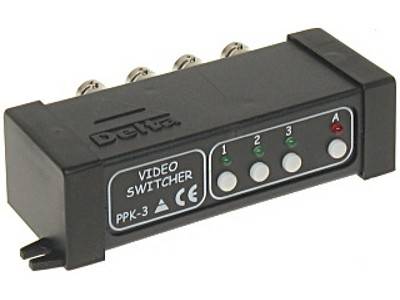
CAMERA SWITCH, ETC.
PPK-3
VIDEO, 3 INPUTS, 1 OUTPUT
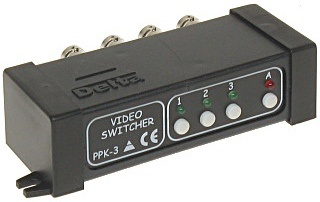
DESCRIPTION
The switch allows you to select one of three signal sources and connect it to the output. The selection can be made manually or automatically. In automatic mode, the signal source switching time can be set from approximately 0.5 seconds to approximately 125 seconds in 0.5 second increments. The time after which the next switching will occur can be set for all cameras at the same time or for each camera separately. It is also possible to set a skip sequence for each input.
DEVICE FUNCTIONS
- Manual and automatic switching
- Possibility to set input switching time
- Ability to set selected inputs to skip
- Configuration saved in the device's non-volatile memory
TECHNICAL SPECIFICATIONS
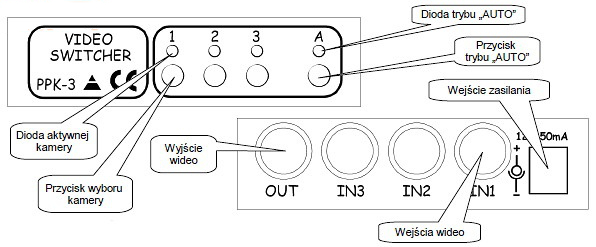
- Number of inputs: 3
- Number of outputs: 1
- Input/output impedance: 75Ω
- Power source: DC 12V / 50mA
- Time adjustment range: 0.5s … 125s
- Dimensions: 120 x 62 x 30 mm
- Weight: 85 g
DEVICE CONFIGURATION
MANUAL AND AUTOMATIC SHIFT.
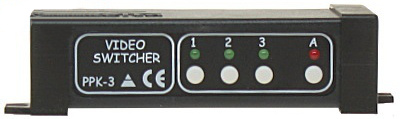
To manually turn on a specific camera, press the corresponding button below the input number. The selected input is indicated by a green LED above the button. When you manually turn on the camera, the automatic function is disabled. The automatic mode is turned on or off by pressing the button marked with the symbol “A”. This mode is indicated by a red LED.
SETTING THE INDIVIDUAL INPUT SWITCH-ON TIME.
To set the switching time for a specific camera, press the button that turns on the corresponding input and hold it until the LED above it starts flashing. Each flashing moment means 0.5 seconds. Therefore, you need to keep the button pressed until you get the desired switching time for a specific input. For example, if the expected time is 5 seconds, hold the button until the LED flashes 10 times. To set a common switching time for all inputs, hold down any two camera switching buttons.
CAMERA RELEASE SETTING.
The user activates the camera skip function by pressing and holding the “A” button for about a second. The red LED will start flashing, while the green LEDs will show which cameras are active (the LED above the active camera is on) and which are inactive (the LED is off). The given input can be activated or deactivated by using the button to turn on the specific camera. If the LED above the button was on, it will turn off after pressing it and vice versa. To exit the procedure and save the settings, press the “A” button again.
SAVING THE CONFIGURATION IN THE SWITCH'S PERMANENT MEMORY.
The device allows you to save the configuration to restore the settings after a power failure. The settings are saved when exiting the camera skip function described in the previous paragraph. The previously configured switching times, the number of skipped entries and information about whether the switch should immediately switch to sweep mode (AUTO mode) after being switched on again are then saved.
To make the switch go into automatic operation mode after turning on the power supply, you must perform the following steps:
- The automatic operation mode must be turned on using the “A” button (the “A” diode lights up),
- You need to turn on the camera release setting function by pressing the “A” button for about a second,
- Exit the camera release setting function by pressing the “A” button again.
To prevent the switch from going into automatic operation mode after turning on the power supply, you must perform the following steps:
- The automatic operation mode must be turned off (LED “A” does not light up),
- You need to turn on the camera release setting function by pressing the “A” button for about a second,
The previously configured switching times, the number of missed entries and information on whether the switch should immediately switch to sweeping mode (AUTO mode) after being switched back on are then saved.
To make the switch go into automatic operation mode after turning on the power supply, you must perform the following steps:
- The automatic operation mode must be turned on using the “A” button (the “A” diode lights up),
- You need to turn on the camera release setting function by pressing the “A” button for about a second,
- Exit the camera release setting function by pressing the “A” button again.
To prevent the switch from going into automatic operation mode after turning on the power supply, you must perform the following steps:
- The automatic operation mode must be turned off (LED “A” does not light up),
- You need to turn on the camera release setting function by pressing the “A” button for about a second,
